How to Deploy a Web Application with Node.js, Nuxt.js, MySQL, and Nginx on DigitalOcean
Learn how to deploy a powerful web application using Node.js, Nuxt.js, MySQL, and Nginx on DigitalOcean Droplets. Follow this step-by-step guide to set up your server, manage traffic, and ensure scalability for web apps

In today's fast-paced digital landscape, creating and deploying web applications has become an essential part of any development project. If you're planning to host a web application that utilizes Node.js, Nuxt.js, and MySQL, and you want to ensure it's accessible to users on the internet, you'll need a robust and reliable hosting solution. Digital Ocean Droplets, a popular cloud computing service, can provide the infrastructure you need to deploy your web application.
In this comprehensive guide, we'll explore how to set up and host a web server using Node.js, Nuxt.js, and MySQL, all orchestrated through Nginx, on Digital Ocean Droplets. But before we dive into the details, let's briefly introduce the key technologies involved in this setup.
Understanding the Technology Stack
Node.js
Node.js is an open-source, server-side runtime environment built on Chrome's V8 JavaScript engine. It allows developers to run JavaScript on the server, enabling them to create efficient and scalable web applications. Node.js is well-known for its non-blocking, event-driven architecture, making it ideal for real-time applications and APIs.
Nuxt.js
Nuxt.js is a popular framework for building server-side-rendered (SSR) and static web applications using Vue.js. It simplifies the process of developing modern web applications by providing a structured and opinionated setup. Nuxt.js can improve your website's performance, SEO, and user experience through server-side rendering.
MySQL
MySQL is an open-source relational database management system that is widely used for storing and managing structured data. It's known for its speed, reliability, and scalability, making it a preferred choice for web applications that require database storage.
Nginx
Nginx is a powerful and efficient web server, reverse proxy server, and load balancer. It excels at handling high levels of concurrent connections and is often used to serve web content, manage traffic, and secure web applications.
Digital Ocean Droplets
Digital Ocean is a cloud infrastructure provider that offers Droplets as virtual private servers. Droplets are scalable, easy to configure, and cost-effective, making them an excellent choice for hosting web applications.
Step-by-Step Setup Process
In the following sections, we'll guide you through the step-by-step process of setting up your web server using these technologies on Digital Ocean Droplets.
Step 1: Creating Your Digital Ocean Droplet
First, create a droplet in Digital Ocean and then assign at least 2GB RAM for the Nuxt application, as it requires that amount of RAM for development.
Begin by creating a new Digital Ocean droplet. When setting up the Virtual Private Cloud (VPC), you will be prompted to enter an SSH key. To generate an SSH key pair, open your terminal and execute the following command:
ssh-keygen
Answer the questions during the key generation process, and it will generate two files: project (the private key) and project.pub (the public key).
Open project.pub, copy its content, and paste it into the SSH key field when creating the droplet.
Step 2: Initial Server Setup and System Updates
Login to the machine through SSH and update the system:
ssh -i project root@your_digital_ocean_ip
# It will show login message
apt update # Checking for update
apt dist-upgrade # for upgrading your machine
dpkg-reconfigure --priority=low unattended-upgrades # for auto updating
Step 3: Creating a Secure User Account
We are going to add a new user and disable root to make the system secure. We will be adding a new user called project-user for this project. We recommend creating a new user for this project. Replace project-user with your desired username:
adduser project-user # assign other details based on your need on the prompt after this
# after the prompt is over, you have to add this user as superuser
usermod -aG sudo project-user
Step 4: Setting Up SSH Keys for the New User
We are going to store SSH key for this user for further connections:
cd project-user
mkdir .ssh
cp /root/.ssh/authorized_keys .ssh/
chmod 700 -R .ssh
sudo chown project-user:project-user .ssh
sudo chown project-user:project-user .ssh/authorized_keys
Step 5: Securing SSH Configuration
Now we are going to disable root login from our SSH configuration:
sudo nano /etc/ssh/sshd_config
# change permitRootLogin yes to permitRootLogin no
# and change passwordAuthentication yes to passwordAuthentication no if you had enabled password authentication at first
sudo systemctl restart sshd
# if it gave error that system can't find sshd, try sudo systemctl restart ssh
Step 6: Installing Node.js
We are installing Node.js on the machine, so head over to the NodeSource distributions repository and follow the command to install the Node.js version that you want.
Step 7: Installing Essential Tools
We will be installing some tools that we will be using later at this step:
sudo apt install mysql-server # for mysql database
sudo apt install nginx # for hosting our server
sudo apt install certbot python3-certbot-nginx # for ssl
Step 8: Configuring Firewall Rules
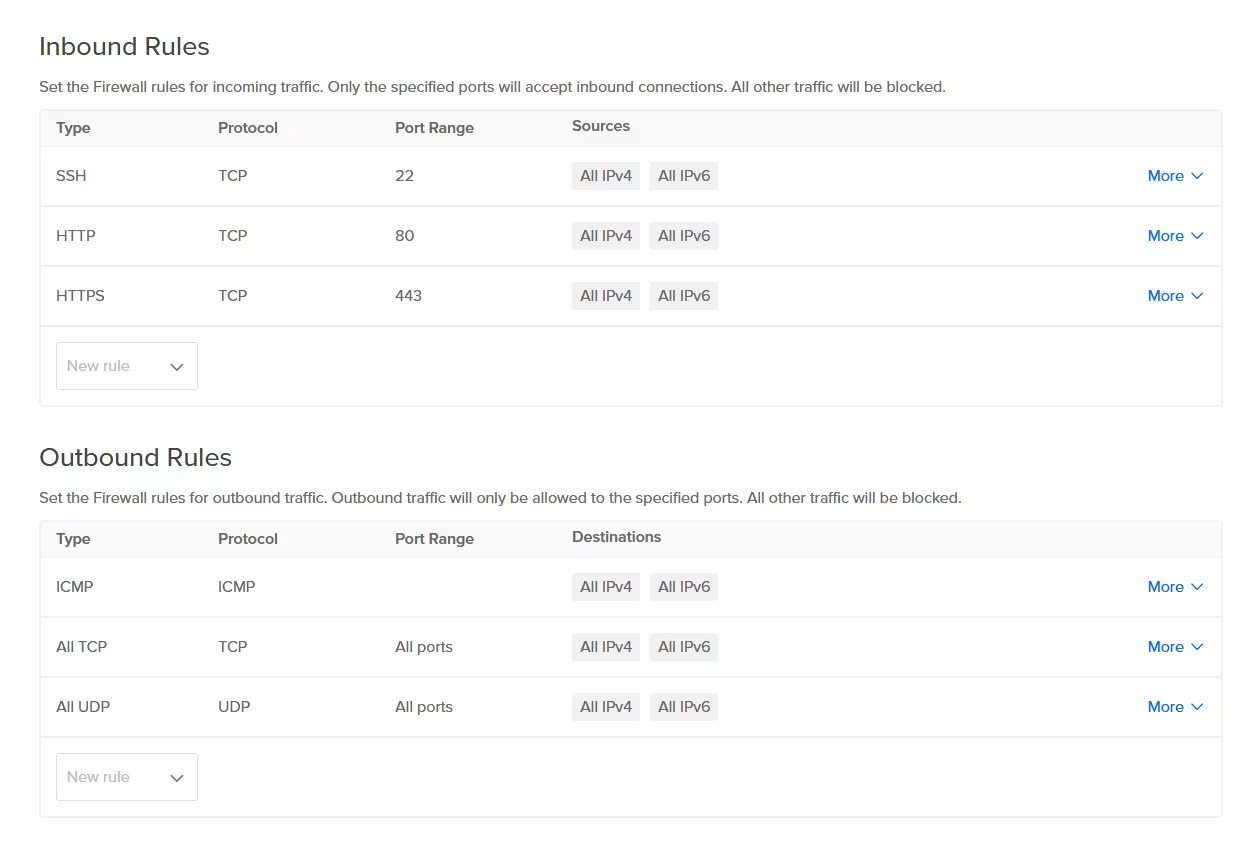
Go to your Digital Ocean dashboard and create a firewall rule which is under the Networking tab. It should look something like this:

Step 9: Final Login with New User
Now you can logout of the machine and log back in with your newly created user:
ssh -i project project-user@your_droplet_ip
Conclusion
In this guide, we've outlined the key steps for setting up a Digital Ocean droplet and securing it for hosting a Nuxt.js application. By following these instructions, you've established a solid foundation for your web hosting environment.
With these steps completed, your server is well-prepared to host your Nuxt.js application. Keep in mind that the specific requirements of your project may vary, and additional configurations might be needed based on your application's needs. Always remember to follow best practices for security, backups, and server maintenance to keep your web hosting environment stable and reliable.